
Product FAQs
Prevention
Profisil® Fluoride Varnish
Yes, very much so. As an alcohol- and rosin-free gel with a choice of flavours, Profisil® Fluoride Varnish is suitable for all age groups, especially children.
In general, cleaning with fluoride toothpaste does enhance overall fluoride supply. Long-term protection arises from the combination of professional lacquer (deposit effect) and daily toothpaste (continuous supply). The effect adds up: The fluoride from the varnish creates a depot through repeated professional application (e.g., every 6 months), while the toothpaste regularly provides new fluoride.
Do not use other products containing fluoride within 24 hours of using the varnish.
The unique mixture of dimethicones in Profisil® Fluoride Varnish allows for a solvent-free and substantive material that has excellent properties of muco-adhesion as well as hard tissue adhesion. The solvent-free formula of Profisil® offers improved biocompatibility, and easier handling, while maintaining effective fluoride delivery.
Unlike varnishes that contain solvent, Profisil® offers unlimited working time during application and is very easy to manipulate into the areas between teeth. Since there is no solvent, there is no risk of clumping from fast solvent evaporation.
Profisil® can be applied to both teeth and soft tissue without the burning sensation from solvent flashing. Patients appreciate the non-stick feel and the silky-smooth tooth surface, along with a refreshing sensation in the mouth. It is well suited for patients of all ages, including children.
Profisil® can be applied equally well to moist or dry teeth and tissue.
A prophylactic cleaning is not required before use. If a cleaning is performed, apply the varnish following scaling and polishing.
No, Profisil® does not contain gluten, peanuts, tree nuts, soy, sesame, corn, shellfish, egg or dairy products. The varnish is free of dyes, color pigments and optical brighteners.
Mint and Unflavored is not made with ethyl alcohol, Berry may contain traces of ethyl alcohol. Allergic reactions to the product cannot be ruled out in sensitive persons. Potential allergenic substances include natural and artificial berry flavor. Do not use this product on any individual who has a known intolerance to fluoride.
Both the dental team and the patient confirm the ease of use and positive results after treatment with Profisil®. Patients appreciate the non-stick feel and the silky-smooth tooth surface, along with an instant, pain-free, refreshing sensation in the mouth. Thanks to its solvent-free formula, there is no burning or bitter aftertaste. Patients report that their symptoms have disappeared or that sensitivity has been significantly reduced.
Profisil® is mucosa-friendly varnish gel for treatment of tooth hypersensitivity and use as part of professional tooth cleaning.
Yes, sensitive teeth are a common problem. Tooth sensitivity affects many people at some point, often due to factors like enamel wear, gum recession, exposed dentin, tooth decay, worn fillings, or recent dental procedures.
Profisil® is transparent and colourless, preventing discolouration of the teeth.
Desensitisation in dentistry refers to reducing tooth sensitivity by blocking dentinal tubules to avoid pain, e.g. from cold, heat, or sugar. Solutions include professional fluoride treatments.
Profisil® Fluoride Varnish adheres to the tooth surface for several hours to days. It creates a durable protective layer with fast desensitization and ongoing fluoride release. Profisil® can be applied every six months in accordance with the standard prophylaxis procedures or as recommended by clinician.
Profisil® from Kettenbach Dental is a fluoride-containing varnish specially developed for the treatment of tooth sensitivity and to support prophylactic treatments. The unique mixture of dimethicones in Profisil® allows for an alcohol- and rosin-free formula, making the varnish user- and patient-friendly and suitable for all age groups, including children.
The single dose blister (0.5 ml) contains sufficient varnish to cover all affected teeth of both the upper and lower arch. Simple, easy, leak-proof and hygienic to apply (even between teeth) without additional instruments. Profisil® is ideal for treating patients who are less compliant with treatment advice, such as children.
Using the supplied applicator brush, mix contents briefly to homogenize the contents prior to application using the non-brush end of the applicator brush.
Profisil® should be applied with smooth brush strokes with an effort to create an even uniform layer over the tooth surfaces. Since there is no solvent, there is no risk of clumping from fast solvent evaporation. You can brush in any direction. The direction of application – vertical or horizontal – makes no difference as once the varnish is on the tooth it will adhere.
Profisil® can be applied to both teeth and soft tissue without the burning sensation from solvent flashing. There is no setting time, and the patient doesn’t need to keep their mouth closed to set the varnish.
Profisil® can be applied equally well to moist or dry teeth and tissue.
Yes, dimethicone in its intended use is considered safe and well-studied. It’s a silicone oil used as a barrier, moisturizer, and anti-sticking agent. In oral care products, it often helps improve mouthfeel and prevents sticking of substances. As with any ingredient, individual allergies or sensitivities can occur.
Dimethicone is a synthetic oil based on silicone. The chemical substance has a moisturising effect. Dimethicone moisturises and protects your skin and hair from drying out. It makes the skin feel soft and fills in small wrinkles. Dimethicone is therefore found in personal care products such as sunscreen, face cream, lip balm, deodorant, shampoo, conditioner and make-up primer.
Rosin can cause a range of symptoms, especially in people who are allergic or sensitive to it. Common reactions include burning or irritation in the mouth, throat, or nose; skin redness, itching, or blistering; and eye irritation, itching, or tearing.
Rosin is a solid form of resin obtained from pine trees. Rosin or its derivatives are used in various industries and are found, usually hidden, in numerous everyday items (e.g., in inks and varnishes). It can cause irritation or allergic reactions for some people, especially with skin contact, inhalation of dust, or eye exposure.
Ethanol, also known as ethyl alcohol, is the best known and most common alcohol, as it is a widely used solvent and the alcohol found in alcoholic beverages. The molecular formula of ethanol is C₂H₅OH, with a molecular weight of C₂H₆O, which is often abbreviated as EtOH.
Profisil® safely delivers a protective coating to the tooth surface. It is designed to securely adhere to the tooth surface for several hours while releasing fluoride ions. To obtain the maximum benefit, we ask that patients follow these recommendations:
- Do not brush or floss for at least four hours.
- If needed, eat only soft food for at least four hours.
- If possible, wait until the next morning to resume to normal oral hygiene.
- Avoid hot drinks and products containing alcohol (beverages, oral rinses, etc.)
The effects of fluoride varnishes persist long after the residue is gone providing long-term protection, especially with repeated applications (e.g. every six months).
Fluoride varnish is applied to the teeth with a brush by a trained dentist, dental hygienist, doctor or nurse. It is a quick and easy process and causes no pain. Profisil® is an alcohol- and rosin-free mucosa-friendly gel with a choice of flavours with pleasant taste and is suitable for all age groups.
Yes. Fluoride varnish is safe for all ages. It can even be used on babies when their first teeth come through. If you have any questions or concerns about using fluoride varnish, talk to your doctor or dentist. Children should visit the dentist from the age of 1 year.
Fluoride varnish is recommended because it supports preventive care and delivers a protective coating to tooth surfaces. It is painless and quick to apply, even with children.
Fluoride varnish is a protective coating that is applied to the teeth to desensitize and to support preventive care. It’s safe, painless, and suitable for children.
Restoration
Visalys® Temp
Nitrile can interfere with the bonding of Visalys® Temp (and other temporary crown and bridge materials). Although direct contact with the glove before curing is very unlikely, vinyl or latex gloves are recommended.
CAVE: Considering your workflow, keep in mind that latex gloves can have a negative effect on the curing of A-silicones.
Yes. However, ensure that eugenol-free temporary cements are used if it is planned to incorporate the subsequent permanent restoration of a composite cement. Eugenol (clove oil) can impair the chemical curing of the composite cement.
Yes.
In principle, yes. Cotton buffs have proven particularly effective.
In principle, yes. Cross-toothed milling machines made of stainless steel have proven particularly effective.
Milling machines can quickly become dull if the smear layer has not been removed beforehand. Therefore, removing the smear layer before milling is definitely recommended. With Visalys® Temp, it can be done very quickly with a disinfectant wipe, for example.
Newly created temporary restorations still contain the lubricating layer, which reacts during a repair or addition, thus creating a chemical compound. This is not the case with older temporary restorations, so milling and bonding serve to create a better chemical bond.
Yes. Any composite can be used for repairs, e.g. Visalys® Bulk Flow.
The curing of the temporary restoration should be checked extraorally, e.g. by means of a material sample on the glove, and intraorally. As soon as the material is so hard that it can be easily pressed in with a fingernail or a probe and an impression remains, the temporary restoration can be removed from the patient’s mouth at the earliest.
Visalys® Temp continues to harden afterwards. After approx. 4 minutes, the material is hard enough that it can be finished well and no longer deforms even under high pressure.
The ideal time for removal depends on the personal preference of the user: Some users prefer it when the temporary is still relatively elastic – others want the temporary restoration to be very hard when it is removed from the mouth. On the other hand, the individual oral situation must also be taken into account: If, for example, there are large undercuts, it is better to remove the temporary restoration at an early stage.
Yes. Visalys® Temp is compatible with any impression material. However, an A-silicone impression is recommended (e.g. Silginat® or Panasil® Putty), as it can be stored and reused for possible repairs or for remaking the provisional.
Yes. Visalys® Temp is a composite as well and could chemically interact with existing composite restorations. Therefore, all composite fillings and core build-ups should be insulated beforehand, for example with petroleum jelly (Vaseline).
No. Visalys® Temp is purely self-curing.
Visalys® Temp from Kettenbach Dental is ideal for the fabrication of temporary crowns, bridges, inlays, onlays, and veneers. It is perfectly suitable for long-term temporaries and has exceptional fracture resistance and very good marginal stability. It offers excellent flow, thixotropy, stability, and user-friendliness. It has a low smear layer and finishes quickly and beautifully to a high gloss. Its natural translucency and opalescence provide for seamless integration in the oral situation, and it is a safe choice as it does not contain bisphenol A.
Visalys® Temp from Kettenbach Dental is a reliable and aesthetic restorative material. It is exceptionally stable and user-friendly, making it ideal for the fabrication of temporary crowns and bridges (as well as provisional inlays, onlays, and veneers). Offering exceptional fracture resistance and stability, it carries a low risk of fracture and is also suitable for long-term temporary restorations.
Visalys® CemCore
Approx. 30 inlays or approx. 14 crowns can be treated per 5 ml syringe.
Glycerine can be used to cover the cement joint excellently.
No, light curing is not required. This means that the primers are also effective in areas that are difficult for light to access (e.g. root canal) and premature curing by ambient light is impossible. Blockage and fitting problems caused by too thick primer layers are avoided. In addition, one work step is omitted.
Accidental light curing of the primers is not harmful.
After the intraoral processing time of approx. 2 minutes, the position of the restoration should not be changed due to the setting behaviour and the resulting adhesive bond.
No. When using the Visalys® Tooth Primer, all etching techniques are possible. If dentin is accidentally etched during the Selective Etch method, this has no effect on the high adhesive force of Visalys® CemCore.
For pre-treatment, the instructions of the pen manufacturer must be observed. If an adhesive/primer is required, the Visalys® Restorative Primer is suitable.
Yes. The root canal must be cleaned and dried. The surfaces in the root canal are then wetted with the Visalys® Tooth Primer.
All remnants of the temporary cement must be removed. The stump surface is cleaned with water spray and then dried. Any remaining tooth structure must be pre-treated with the Visalys® Tooth Primer according to the instructions. Subsequently, the restoration can be directly attached with Visalys® CemCore without further pre-treatment of the composite surfaces.
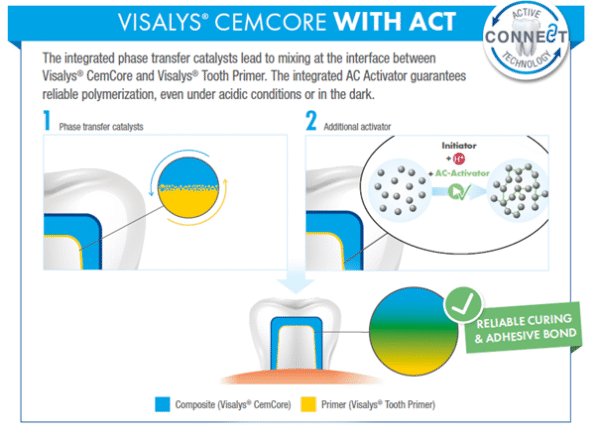
Dual-curing composites without Active Connect Technology often do not cure completely on acid-etched tooth surfaces and/or those pretreated with adhesive or primer and require an additional activator (referred to as self-cure activators (SCA)).
Cementation composites must be as hydrophilic as possible while also having very good flowability. Core build-ups require a high degree of stability and a material that swells as little as possible. Kettenbach Dental has developed a groundbreaking technology that simply eliminates the conflicts: Active-Connect-Technology (ACT) allows optimal mixing of the somewhat hydrophobic cementation composite Visalys® CemCore with the hydrophilic Visalys® Tooth Primer on the damp surface of the tooth. The innovative composite achieves a high adhesive strength despite its hydrophobic properties while also avoiding swelling.
After the contact of Visalys® CemCore (hydrophobic) with the water-based VISALYS® Tooth Primer (hydrophilic), which penetrates deep into the tooth surface, the phase transfer catalyst is activated:
Yes. Visalys® CemCore is also suitable for attachment to common implant abutments. The abutment must be pre-treated according to the specifications of the respective manufacturer.
Unlike universal bondings, the Visalys® Restorative Primer is not acidic, leading to the adhesive monomers in the primer being particularly stable.
Yes. The Visalys® Restorative Primer is ideal for the pre-treatment of fracture surfaces.
A water-based primer ensures a well-opened collagen network even in the event of accidental overdrying of the dentin and penetrates deep into the surface. Since no organic solvent such as ethanol is used, optimal wetting of the hydrophilic dentine surface can be guaranteed. In addition, water cannot evaporate from the opened bottle as quickly as organic solvents.
The Visalys® Tooth Primer can also be used as an adhesive/primer with Visalys® Core. Use with other composites is not indicated.
No. Although the use of a restoration primer is mandatory, other restoration primers suitable for the respective surface can also be used.
Yes. The excellent adhesion values to the tooth substance can only be achieved by combining Visalys® CemCore and Visalys® Tooth Primer.
This combination is contraindicated and not according to the instructions for use. Adhesion may be compromised.
In a bonding test (ISO 29022), the combination of Visalys® Tooth Primer and Visalys® CemCore achieves sufficient bonding strength on all surfaces (≥ 5 MPa). On glass ceramics, adhesion is only minimally above the threshold value of 5 MPa, as without the silane contained in Visalys® Restorative Primer, proper bonding is not possible.
The values, however, are significantly poorer than the intended combination of Visalys® Restorative Primer and Visalys® CemCore.
Always choose the correct material combination (Visalys® Tooth Primer for tooth substrate only, Visalys® Restorative Primer for restorative materials). The IFU and step-by-step instructions are helpful tools to guide you through the process.
It is important to determine whether the bonding failed on the tooth side (with residual composite cement on the resin-bonded bridge) or on the restoration side (with residual composite cement on the tooth surface).
Resin-bonded bridges can be somewhat challenging, as they require high bond strength while offering only a limited surface for adhesion. In this case, we recommend selectively etching the enamel surface (see the information in the instructions for use).
For the resin-bonded bridge itself, we recommend following the established procedures, depending on the material of the bridge:
- In the case of zirconium dioxide: sandblasting.
- In the case of silicate ceramic: etching with hydrofluoric acid.
In both cases, Visalys® Restorative Primer is applied as usual.
The pretreatment of the restoration surface / resin-bonded bridge is very important, as increasing the surface area (through sandblasting or hydrofluoric acid etching) is the key factor for successful bonding.
Before cementation with Visalys® CemCore, Visalys® Tooth Primer is first applied to the tooth surface.
Visalys® CemCore is the best choice for preventing tooth fractures for several reasons: Thanks to its extremely low water absorption properties, the risk of tooth fracture is reduced. Visalys® CemCore is a 2-in-1 dual-curing luting composite and core build-up material. It offers excellent dimensional stability and, with its unique Active-Connect Technology, guarantees optimal adhesive bond for all indirect restorations. With Visalys® CemCore, you really are on the safe side: The material is also 100% free from bisphenol A.
Visalys® CemCore from Kettenbach Dental is a dual-curing luting composite designed for safe and predictable cementation of all indirect restorations. This 2-in-1 product can also be used for fabricating core build-ups and build-up fillings. The unique, patented Active-Connect Technology eliminates typical conflicts and enables optimal mixing of the somewhat hydrophobic composite Visalys® CemCore with the hydrophilic Visalys® Tooth Primer on the damp tooth surface, resulting in a permanently high adhesive bond. Visalys® CemCore features excellent flow properties, is radiopaque, bisphenol-A-free, and ready to use.
Impression
Panasil®
Apply adhesive onto the dry impression tray and allow it to dry for approx. 5 minutes. The adhesive must be dry before the tray is filled with impression material.
To allow the tray adhesive to work effectively, ensure that there is no inhibition layer on the surface of custom trays. If necessary, remove the smear layer with alcohol or mechanically.
Rinse, dry and disinfect the impression. We recommend using disinfectant solutions specially designed for impression materials (2% acidic glutaraldehyde solution). See manufacturer instructions.
After the material has completely set, remove the impression in the same direction as the tooth axis. Tilting the tray too much can cause permanent deformation. Strong rocking movements increase the risk of elastic deformation. It is recommended to place the index fingers into the vestibule and remove the impression tray as vertically as possible to the occlusal plane with a slight rotational movement.
The filled tray should be lowered as vertically as possible to the occlusal plane (material surface and occlusal plane should be parallel to each other), with the pressure being increased slowly. Hold in position. Do not fully depress the tray. Do not hand the impression tray over to others.
With the jumbo cartridge, discard at least the first 3 cm of mixed material. For subsequent mixings, no further material needs to be discarded (unless the plunger is restarted or the cartridge used in another mixing unit).
With the 50 ml cartridge, dispense a small amount of material at each use until equal amounts of both materials are extruded at the same rate.
To avoid air entrapment, the outlet opening of the dynamic or static mixer should always remain immersed in the material. The tray should always be completely filled. If the clinical situation allows, the palatal vault in the maxilla should also be covered with impression material.
Apply adhesive onto the dry impression tray and allow it to dry for approx. 5 minutes. The adhesive must be dry before the tray is filled with impression material. We recommend using our Universal Adhesive, suitable for all Kettenbach Dental impression materials. The surface of the impression tray must be repeatedly and fully brushed so that the entire surface of the tray is visibly covered. Load the tray within 30 minutes of applying the adhesive.
Yes, absolutely. A mixing tips’s diameter and length must be matched to the material. Some mixers available on the market appear to be suitable, but do not mix homogeneously. To ensure best results, always use original Kettenbach Dental mixing tips. Compatible accessories are always displayed on the product sites.
Do not use latex gloves. Latex has a negative effect on the curing of A-silicones and Identium® and can cause poor-quality impressions.
Reasons for delayed / no setting and setting times longer or shorter than indicated include:
- The material could be too warm or too cold. Always bring the impression material to room temperature first: working and setting times are affected by higher or lower temperatures.
- With a hand-mixed A-silicone putty, it is important that the ratio of catalyst to base material is 50/50%; otherwise, setting times may be affected.
- Do not use latex gloves.
- Discard a little material at first (jumbo cartridge) / before each (50 ml cartridge) use.
- Do not mix different types of material. Use dedicated accessories (e.g. application syringes) for each type of material (e.g. polyether vs. A-silicone), do not use accessories “contaminated” with other types of materials
- Retraction agents containing ferric sulfate, epinephrine or aluminium chloride may have a negative effect on the setting. When using such materials, rinse area thoroughly.
We generally recommend the use of impression trays that allow sufficient pressure to build up, especially with medium (Type 2) and heavy body (Type 1) impression materials. Closed trays as well as custom trays are suitable; perforated trays are not recommended. When selecting a ready-made tray, it is important to choose a well-fitting, rigid tray. Stock trays can be customized for higher pressure build-up by blocking out the palatal area or the posterior end of the tray.
When selecting the tray size, always ensure that the distance from the tray wall to the tooth equator is at least three times the depth of the undercut. It is of course also important to use a tray that fits as well as possible, which provides adequate but not excessive space and thus permits optimal pressure build-up.
We recommend using a custom tray when taking impressions with impression posts and for fixation impressions. Prefabricated trays can also be customized by damming around the palate area or on the end of the tray for a greater build-up of pressure. The distance between tray wall and tooth equator should be at least 3 times greater than the depth of the undercut.
A good individual tray requires a preliminary impression. If trays are printed, it is preferable to make the preliminary impression with a scan-optimised impression material.
Any inhibition layer on the plastic individual tray can interfere with the setting of the impression material and must be thoroughly removed before use.
Every impression material shrinks (minimally) and in order to make this shrinkage predictable and controllable, it is important to be able to create an even impression material thickness between the elements and the inside of the impression tray. Because adhesion occurs between the tray and the impression material, this material shrinkage always occurs towards the tray wall. The more shrinkage the impression material has, the greater the cement thickness will be when placing the crown and bridge work. It is important that the tray is not too tight; in addition to blocking out undercuts, sufficient impression space (at least 4 to 5 mm) must also be left.
- Select appropriate impression tray, ensure proper size and fit.
- Apply Kettenbach Dental Universal Adhesive 5 min before taking the impression.
- Prepare the oral situation: Block out large undercut areas, expand the sulcus and control bleeding. For subgingival preparation margins, use retraction cords. If applicable, clean the prepared stumps.
- Prepare impression material and accessories: Bring material to room temperature. Depending on type of cartridge, discard some material. Mix the material homogeneously and fill the tray completely and continuously without interruption. Leave the mixing tip in the material when filling the tray to avoid bubbles. For hand-mixed putties, maintain a 1:1 ratio of catalyst to base material. Do not use latex gloves or polyether “contaminated” accessories. If applicable, thoroughly remove any inhibition layer on the surface of custom trays.
- Insert the filled impression tray into the patient’s mouth as vertically as possible to the occlusal plane. Set a timer according to the indicated setting time. Hold the tray in position, do not fully depress. Do not hand the impression tray over to others.
- After the material has completely set, remove the impression tray as vertically as possible to the occlusal plane with a slight rotational movement.
- Rinse, dry and disinfect the impression.
General guidance: Always follow manufacturer instructions and observe working and setting times. To ensure best results, use original mixing tips.
For more tips, consult our product-specific FAQs and troubleshooting guide.
Longer or shorter setting times (than indicated):
- The material could be too warm or too cold. Always bring the impression material to room temperature first: working and setting times are affected by higher or lower temperatures.
- With a hand-mixed A-silicone putty, it is important that the ratio of catalyst to base material is 50/50%; otherwise, setting times may be affected.
No / delayed setting:
- Do not use latex gloves.
- Discard a little material at first (jumbo cartridge) / before each (50 ml cartridge) use.
- Do not mix different types of material. Use dedicated accessories (e.g. application syringes) for each type of material (e.g. polyether vs. A-silicone), do not use accessories “contaminated” with other types of materials
- Retraction agents containing ferric sulfate, epinephrine or aluminium chloride may have a negative effect on the setting. When using such materials, rinse area thoroughly.
No adhesive bonding:
- The adhesive must be dry before the tray is filled with impression material.
- To allow the tray adhesive to work effectively, ensure that there is no inhibition layer on the surface of custom trays. If necessary, remove the smear layer with alcohol or mechanically.
General tips:
- Leave the mixer in the material when dispensing to avoid air bubbles.
- To ensure best results, always use original mixing tips.
- Always follow manufacturer guidances.
Impression material should be stored in a dry place at room temperature. Direct sunlight and extreme temperature changes must be avoided. If storage temperature is clearly below/above room temperature, bring the impression material to room temperature before use. If the impression material is too cold during impression taking, the setting times will be longer than stated, and if you are working in a (too) warm room, the processing and setting times will be much faster than normal.
Before taking an impression, any bleeding must be brought under control. Retraction cords and liquids containing ferric sulfate, epinephrine or aluminium chloride can lead to setting inhibition. Therefore, after using such materials, the contaminated areas must be thoroughly rinsed. Remove retraction cord or paste and any cotton rolls from the patient’s mouth just before inserting the tray into the patient’s mouth.
Identium®
Yes. However, the syringe must be free of any residues from other materials. We recommend using a dedicated application syringe for each material type. Filling with mixed material from the jumbo cartridge or the 50 ml cartridge should be done continuously without interruption. Before use, the syringe tip must be completely filled by applying pressure to the plunger.
No. Due to its special chemistry, when two viscosities are used together – as in the double-mix impression technique – only materials from the Identium® range should be used.
Chemically, the Identium® materials are a mixture of vinyl polysiloxane, also known as A-silicones and polyether materials. Each material group has different advantages. Identium® combines the benefits of both groups in a single material.
Apply adhesive onto the dry impression tray and allow it to dry for approx. 5 minutes. The adhesive must be dry before the tray is filled with impression material.
To allow the tray adhesive to work effectively, ensure that there is no inhibition layer on the surface of custom trays. If necessary, remove the smear layer with alcohol or mechanically.
Rinse, dry and disinfect the impression. We recommend using disinfectant solutions specially designed for impression materials (2% acidic glutaraldehyde solution). See manufacturer instructions.
After the material has completely set, remove the impression in the same direction as the tooth axis. Tilting the tray too much can cause permanent deformation. Strong rocking movements increase the risk of elastic deformation. It is recommended to place the index fingers into the vestibule and remove the impression tray as vertically as possible to the occlusal plane with a slight rotational movement.
The filled tray should be lowered as vertically as possible to the occlusal plane (material surface and occlusal plane should be parallel to each other), with the pressure being increased slowly. Hold in position. Do not fully depress the tray. Do not hand the impression tray over to others.
With the jumbo cartridge, discard at least the first 3 cm of mixed material. For subsequent mixings, no further material needs to be discarded (unless the plunger is restarted or the cartridge used in another mixing unit).
With the 50 ml cartridge, dispense a small amount of material at each use until equal amounts of both materials are extruded at the same rate.
To avoid air entrapment, the outlet opening of the dynamic or static mixer should always remain immersed in the material. The tray should always be completely filled. If the clinical situation allows, the palatal vault in the maxilla should also be covered with impression material.
Apply adhesive onto the dry impression tray and allow it to dry for approx. 5 minutes. The adhesive must be dry before the tray is filled with impression material. We recommend using our Universal Adhesive, suitable for all Kettenbach Dental impression materials. The surface of the impression tray must be repeatedly and fully brushed so that the entire surface of the tray is visibly covered. Load the tray within 30 minutes of applying the adhesive.
There are plenty of impression materials available that can be used to achieve the desired transfer of the oral situation to the working model. The best choice is to use an impression technique, with the corresponding consistency(ies), that suits the practitioner and the requirements of the dental laboratory. The success of the final piece of work is partly determined by the ease of use, the material properties and knowledge of the impression material.
Identium® is a highly accurate impression material with excellent pressure build-up, high tensile strength and tear resistance, easier to remove from the mouth and a more pleasant taste. Thanks to its unique composition, Identium® has the best properties of both polyether and addition silicones; the best of both worlds. Thanks to their high final hardness (immediately after removal from the mouth), Identium® Medium and Heavy (including the fast variants) are highly suitable as impression materials for all your implant work. If an impression combination with Identium® light is made, it is important that the transfer pins are sufficiently enclosed by the stronger Identium® Medium or Heavy impression material.
Yes, absolutely. A mixing tips’s diameter and length must be matched to the material. Some mixers available on the market appear to be suitable, but do not mix homogeneously. To ensure best results, always use original Kettenbach Dental mixing tips. Compatible accessories are always displayed on the product sites.
Do not use latex gloves. Latex has a negative effect on the curing of A-silicones and Identium® and can cause poor-quality impressions.
We generally recommend the use of impression trays that allow sufficient pressure to build up, especially with medium (Type 2) and heavy body (Type 1) impression materials. Closed trays as well as custom trays are suitable; perforated trays are not recommended. When selecting a ready-made tray, it is important to choose a well-fitting, rigid tray. Stock trays can be customized for higher pressure build-up by blocking out the palatal area or the posterior end of the tray.
When selecting the tray size, always ensure that the distance from the tray wall to the tooth equator is at least three times the depth of the undercut. It is of course also important to use a tray that fits as well as possible, which provides adequate but not excessive space and thus permits optimal pressure build-up.
We recommend using a custom tray when taking impressions with impression posts and for fixation impressions. Prefabricated trays can also be customized by damming around the palate area or on the end of the tray for a greater build-up of pressure. The distance between tray wall and tooth equator should be at least 3 times greater than the depth of the undercut.
A good individual tray requires a preliminary impression. If trays are printed, it is preferable to make the preliminary impression with a scan-optimised impression material.
Any inhibition layer on the plastic individual tray can interfere with the setting of the impression material and must be thoroughly removed before use.
Every impression material shrinks (minimally) and in order to make this shrinkage predictable and controllable, it is important to be able to create an even impression material thickness between the elements and the inside of the impression tray. Because adhesion occurs between the tray and the impression material, this material shrinkage always occurs towards the tray wall. The more shrinkage the impression material has, the greater the cement thickness will be when placing the crown and bridge work. It is important that the tray is not too tight; in addition to blocking out undercuts, sufficient impression space (at least 4 to 5 mm) must also be left.
- Select appropriate impression tray, ensure proper size and fit.
- Apply Kettenbach Dental Universal Adhesive 5 min before taking the impression.
- Prepare the oral situation: Block out large undercut areas, expand the sulcus and control bleeding. For subgingival preparation margins, use retraction cords. If applicable, clean the prepared stumps.
- Prepare impression material and accessories: Bring material to room temperature. Depending on type of cartridge, discard some material. Mix the material homogeneously and fill the tray completely and continuously without interruption. Leave the mixing tip in the material when filling the tray to avoid bubbles. For hand-mixed putties, maintain a 1:1 ratio of catalyst to base material. Do not use latex gloves or polyether “contaminated” accessories. If applicable, thoroughly remove any inhibition layer on the surface of custom trays.
- Insert the filled impression tray into the patient’s mouth as vertically as possible to the occlusal plane. Set a timer according to the indicated setting time. Hold the tray in position, do not fully depress. Do not hand the impression tray over to others.
- After the material has completely set, remove the impression tray as vertically as possible to the occlusal plane with a slight rotational movement.
- Rinse, dry and disinfect the impression.
General guidance: Always follow manufacturer instructions and observe working and setting times. To ensure best results, use original mixing tips.
For more tips, consult our product-specific FAQs and troubleshooting guide.
Longer or shorter setting times (than indicated):
- The material could be too warm or too cold. Always bring the impression material to room temperature first: working and setting times are affected by higher or lower temperatures.
- With a hand-mixed A-silicone putty, it is important that the ratio of catalyst to base material is 50/50%; otherwise, setting times may be affected.
No / delayed setting:
- Do not use latex gloves.
- Discard a little material at first (jumbo cartridge) / before each (50 ml cartridge) use.
- Do not mix different types of material. Use dedicated accessories (e.g. application syringes) for each type of material (e.g. polyether vs. A-silicone), do not use accessories “contaminated” with other types of materials
- Retraction agents containing ferric sulfate, epinephrine or aluminium chloride may have a negative effect on the setting. When using such materials, rinse area thoroughly.
No adhesive bonding:
- The adhesive must be dry before the tray is filled with impression material.
- To allow the tray adhesive to work effectively, ensure that there is no inhibition layer on the surface of custom trays. If necessary, remove the smear layer with alcohol or mechanically.
General tips:
- Leave the mixer in the material when dispensing to avoid air bubbles.
- To ensure best results, always use original mixing tips.
- Always follow manufacturer guidances.
Impression material should be stored in a dry place at room temperature. Direct sunlight and extreme temperature changes must be avoided. If storage temperature is clearly below/above room temperature, bring the impression material to room temperature before use. If the impression material is too cold during impression taking, the setting times will be longer than stated, and if you are working in a (too) warm room, the processing and setting times will be much faster than normal.
Before taking an impression, any bleeding must be brought under control. Retraction cords and liquids containing ferric sulfate, epinephrine or aluminium chloride can lead to setting inhibition. Therefore, after using such materials, the contaminated areas must be thoroughly rinsed. Remove retraction cord or paste and any cotton rolls from the patient’s mouth just before inserting the tray into the patient’s mouth.
Before processing Identium® impression material, first bring the impression material to room temperature. Processing and curing times are affected by higher or lower temperatures. Do not use latex gloves or a polyether “contaminated” impression syringes. First remove the inhibition layer (lubricant layer) from an individual tray before taking an impression.
Temperature (warmer or colder than room temperature), latex and a polyether “contaminated” impression syringe, as well as the inhibition layer (lubricating layer) of a temporary restoration material left behind on the preparation, can adversely affect the curing of the Identium® impression material. Furthermore, some retraction agents may have a negative effect on curing; however, we have not received any complaints about this in relation to Kettenbach impression materials for decades.
Mucopren®
Mucopren® Soft from Kettenbach Dental is a soft long-term relining material for removable dentures as well as for interim or implant-supported restorations based on A-silicone for direct and indirect application. The material is also very useful for many other indications, like relieving the operation site after placing implants, for balancing areas of mucous membrane with varying degrees of resiliency and also for relieving sharp bony ridges.
The material features excellent adhesion to acrylic dentures through patented Mucopren® Adhesive and guarantees long period in situ and high comfort for the patient.